

How to Install and Configure HashiCorp Vault for Terraform on Ubuntu 24.04
HashiCorp Vault is an open-source tool designed for managing secrets and protecting sensitive data in dynamic infrastructure environments. It's commonly used in DevOps, cloud-native, and microservices architectures.
🔐 What Vault Does
Vault provides:
Secrets Management: Securely store and control access to tokens, passwords, certificates, API keys, and other sensitive data.
Dynamic Secrets: Generate secrets on the fly (e.g., database credentials that expire after use).
Data Encryption: Encrypt and decrypt data without storing it, using APIs.
Access Control: Fine-grained policies to control who can access what.
Audit Logs: Full traceability of access and actions taken.
sudo apt-get update && sudo apt-get upgrade -y
wget -O- https://apt.releases.hashicorp.com/gpg | sudo gpg --dearmor -o /usr/share/keyrings/hashicorp-archive-keyring.gpg
echo "deb [signed-by=/usr/share/keyrings/hashicorp-archive-keyring.gpg] https://apt.releases.hashicorp.com $(lsb_release -cs) main" | sudo tee /etc/apt/sources.list.d/hashicorp.list
sudo apt update && sudo apt install vault
# Enable, start and check the Vault Services.
systemctl daemon-reload
systemctl start vault
systemctl enable vault
systemctl status vault
Go to https://127.0.0.1:8200/
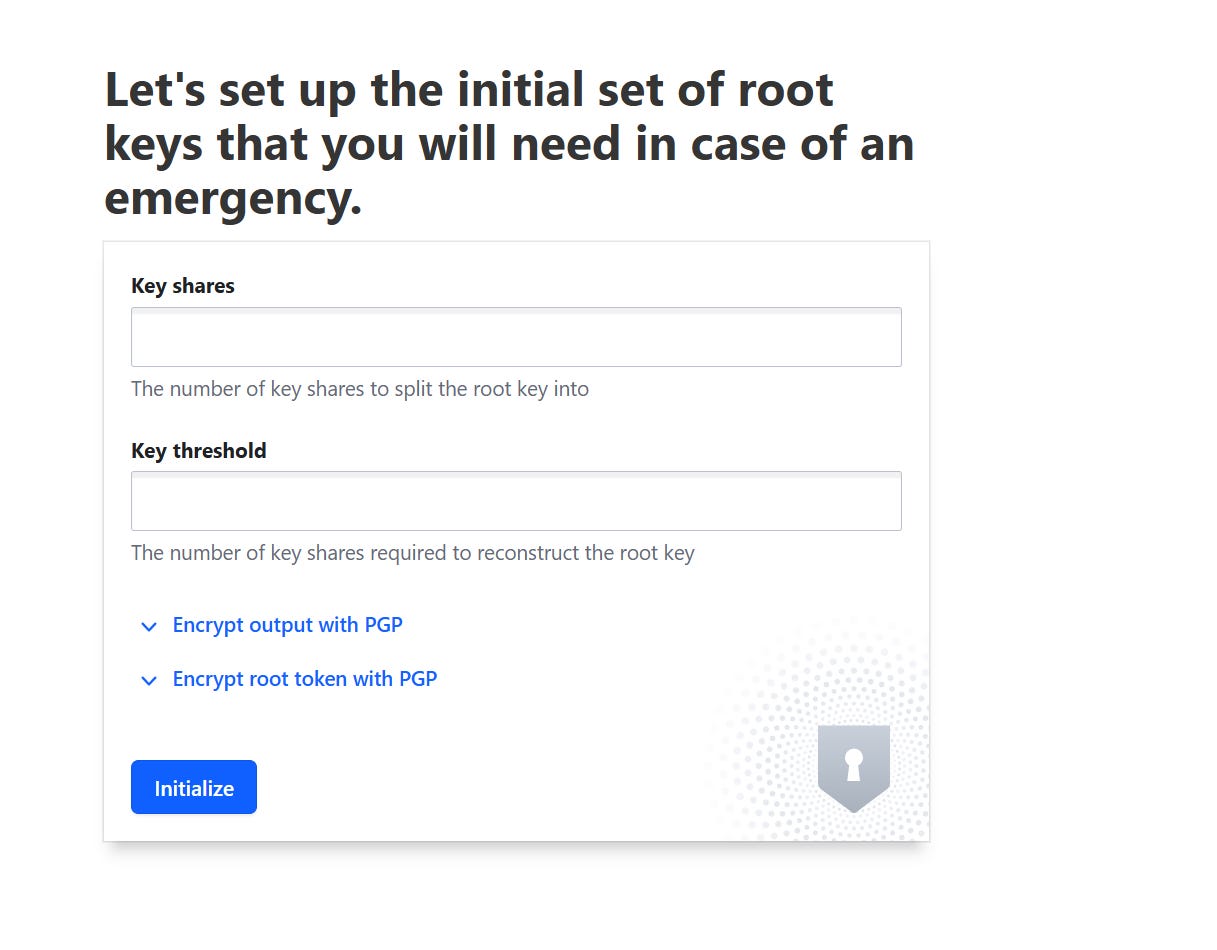
Key shares: This is where you would enter the total number of pieces you want to split the root key into. This is part of a "shamir's secret sharing" or similar scheme, where the key is divided into multiple parts.
Key threshold: This is where you enter the minimum number of key shares that are required to reconstruct the root key. For example, if you split it into 5 shares (Key shares = 5) and set the threshold to 3 (Key threshold = 3), then any 3 of those 5 shares would be enough to reconstruct the original root key.A good starting point for many organizations is often (5 Key shares, 3 Key threshold). This provides a good balance between redundancy (you can lose 2 shares) and security (it requires 3 individuals to collude). However, always consult with your organization's security team or policy to determine the most appropriate values for your specific context.

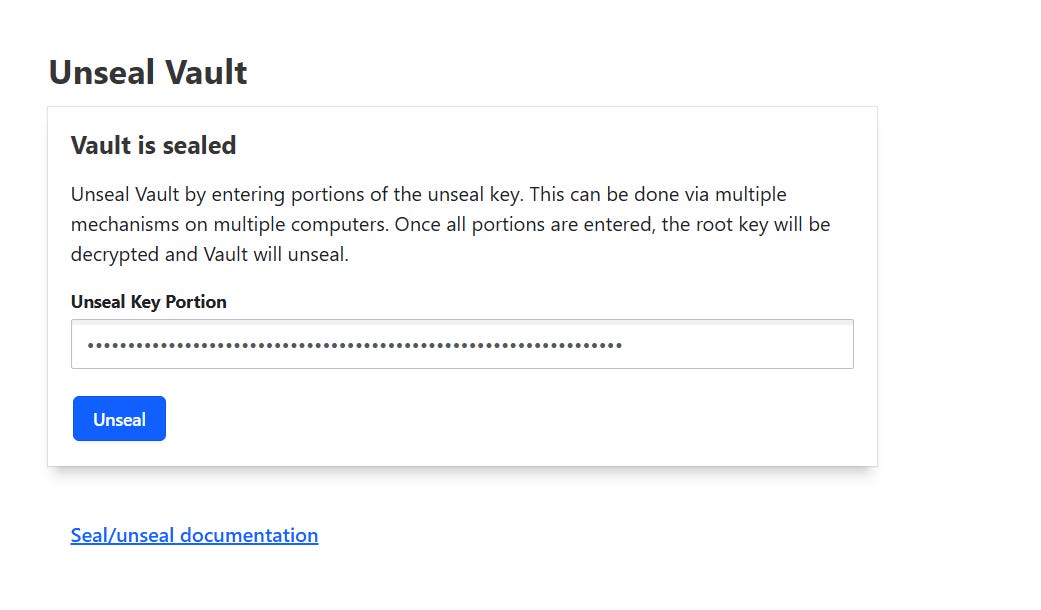
Download keys, for login,use “root_token” to Unseal the key.
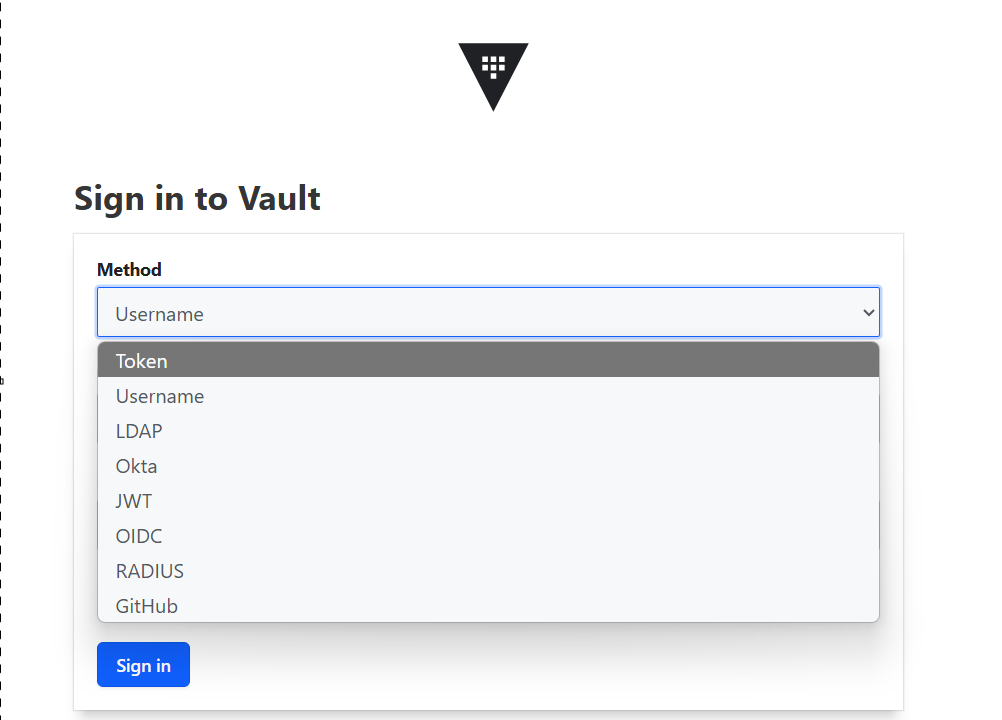
Choose Token for logging in.
Binding SSL certificate and log in without specifying port number 8200
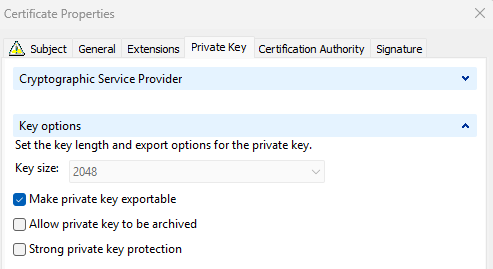
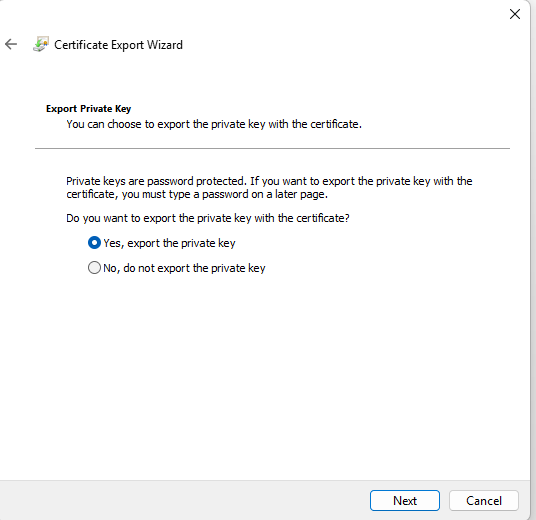
Create SSL cert with subject/SAN name you want to use,that DNS name must resolve to IP address and export it as PFX (export private key).
Move PFX file to vault machine and extract public/private key
# Extract the Private Key from PFX
openssl pkcs12 -in /home/ja/vault.pfx -nocerts -out /opt/vault/tls/vault-private.pem -nodes
# Extract the Certificate(s) from PFX
openssl pkcs12 -in /home/ja/vault.pfx  -nokeys -out /opt/vault/tls/vault-cert.pem
# Combine them into a single PEM file-contains both the private key and the certificate
cat /opt/vault/tls/vault-private.pem /opt/vault/tls/vault-cert.pem > /opt/vault/tls/vault.pem
Edit /etc/vault.d/vault.hcl and change path to pem files# Edit /etc/vault.d/vault.hcl and change path to pem files
# HTTPS listener
listener "tcp" {
  address       = "0.0.0.0:8200"
  tls_cert_file = "/opt/vault/tls/vault.pem"
  tls_key_file  = "/opt/vault/tls/vault.pem"
}
# Add audit section
audit "file" {
  path = "/var/log/vault_audit.log" # Or similar path
  log_requests = true
  log_response = true
}
# Restart vault to applly changes
systemctl restart vault
# If using internal CA, export CA cert without private key and as Base-64 Encoded to vault server and store it in Ubuntu SSL cert store
cp ca.crt /usr/local/share/ca-certificates/
sudo update-ca-certificateNginx configuration
Nginx will serve as reverse proxy and will forward all requests from https://vault.example.com to https://vault.example.com:8200
Install Nginx:
sudo apt install nginxCreate file /etc/nginx/sites-available/vault.conf
# Redirect HTTP to HTTPS (Optional but Recommended)
server {
    listen 80;
    listen [::]:80;
    server_name vault.example.com;

    # Optional: If you want to force HTTPS for all requests
    return 301 https://$host$request_uri;
}

# HTTPS Virtual Host for Vault
server {
    listen 443 ssl http2;
    listen [::]:443 ssl http2;
    server_name vault.example.com;

    # SSL/TLS Configuration
    # Replace with the actual paths to your certificate and private key
    ssl_certificate /opt/vault/tls/vault.pem;
    ssl_certificate_key /opt/vault/tls/vault.pem;

    # Optional: Stronger TLS settings (recommended)
    ssl_protocols TLSv1.2 TLSv1.3;
    ssl_prefer_server_ciphers off;
    ssl_ciphers "EECDH+AESGCM:EDH+AESGCM:AES256+EECDH:AES256+EDH";
    ssl_session_cache shared:SSL:10m;
    ssl_session_timeout 10m;
    ssl_stapling on;
    ssl_stapling_verify on;
    resolver 8.8.8.8 8.8.4.4 valid=300s; # Adjust resolver to your DNS server
    resolver_timeout 5s;
    add_header Strict-Transport-Security "max-age=31536000; includeSubDomains" always;
    add_header X-Frame-Options DENY;
    add_header X-Content-Type-Options nosniff;
    add_header X-XSS-Protection "1; mode=block";

    # Proxy Vault requests
    location / {
        proxy_pass https://127.0.0.1:8200; # This is where Nginx forwards the request

        # Forward necessary headers to Vault
        proxy_set_header Host $host;
        proxy_set_header X-Real-IP $remote_addr;
        proxy_set_header X-Forwarded-For $proxy_add_x_forwarded_for;
        proxy_set_header X-Forwarded-Proto $scheme;

        # These headers are often needed for Vault's UI and API to function correctly
        proxy_set_header X-Vault-Request true;
        proxy_set_header X-Forwarded-Host $host;

        # WebSocket support for Vault's UI (if needed)
        proxy_http_version 1.1;
        proxy_set_header Upgrade $http_upgrade;
        proxy_set_header Connection "upgrade";

        # Optional: Adjust buffer sizes for larger requests/responses
        proxy_buffers 16 4k;
        proxy_buffer_size 8k;
        proxy_read_timeout 90s; # Adjust as needed for long-running Vault operations
    }

    # Optional: Serve a custom error page
    error_page 500 502 503 504 /50x.html;
    location = /50x.html {
        root /usr/share/nginx/html;
    }
}
Create symbolic link and restart Nginx
sudo ln -s /etc/nginx/sites-available/vault.conf /etc/nginx/sites-enabled/
systemctl restart nginx
Add Vault url to Environment Variable
vi ~/.bashrc
export VAULT_ADDR='https://vault.example.com'
Install Az Module and Create Azure Service Principal with Contributor Access for Terraform
curl -sL https://aka.ms/InstallAzureCLIDeb | sudo bash
az login
az ad sp create-for-rbac --name "Terraform" --role="Contributor" --scopes="/subscriptions/$(az account show --query id -o tsv)"
Create Secrets in Key Vault
# if vault is sealed, unseal it, run this command 3 times and each time enter 1 key from downloaded JSON file (downloaded during vault initialization)
vault operator unseal
# Enable secrets
vault secrets enable -path=azure-creds kv-v2
vault kv put azure-creds/terraform/azure_sp \
    client_id="<YOUR_AZURE_SERVICE_PRINCIPAL_APP_ID>" \
    client_secret="<YOUR_AZURE_SERVICE_PRINCIPAL_PASSWORD>" \
    tenant_id="<YOUR_AZURE_SERVICE_PRINCIPAL_TENANT_ID>" \
    subscription_id="<YOUR_AZURE_SUBSCRIPTION_ID>"
# Verify the secret is stored
vault kv get azure-creds/terraform/azure_sp
Creating secrets for Windows/Linux Azure VMs
If planning to deploy VMs, we need to store these credentials in Vault.The most straightforward way to store VM passwords in Vault is using a Key/Value (KV) secret engine. Vault's KV secret engines store arbitrary secrets (like usernames and passwords) at a specified path.KV Version 2 (Recommended): Provides versioning of secrets, allowing you to retrieve previous versions and providing greater auditability.
# Enable KV Version 2
vault secrets enable -path=secret kv-v2
# Windows credentials
vault kv put secret/windows-vm username=vmadmin password='SuperSecurePassword123!'
# Linux credentials
vault kv put secret/linux-vm username=root password='123!'
Using Vault App roles
AppRole is the best practice for authenticating machines, applications, and automated workflows (like Terraform, CI/CD pipelines, cron jobs, etc.) to Vault. It's designed to be secure, automatable, and doesn't require hardcoding sensitive tokens.
AppRole is a Vault authentication method that allows machines or applications to authenticate securely. It uses two components:
Role ID: A non-secret identifier for a specific "role" (e.g., "terraform-deployer," "my-ci-pipeline"). It's safe to be stored in configuration.Secret ID: A secret that acts like a password for that role. It's highly sensitive and should be kept private and rotated.
An application performs an authentication request by combining its Role ID and Secret ID. Vault then returns a Vault token that the application can use to perform its authorized actions.
Setting up AppRole Authentication for Terraform
Create a Policy for your Terraform AppRole
Policies define what permissions tokens generated by this AppRole will have. For Terraform, you'll need permissions to read the Azure credentials you stored and potentially other secrets that Terraform might need (e.g., database credentials for a database resource).
terraform-azure-policy.hcl:
Grants read access to a specific secret located at:azure-creds/data/terraform/azure_sp, secret/data/linux-vm/* and secret/data/windows-vm/*
Grants the ability to create child tokens (i.e., generate new Vault tokens).
Used in cases where an identity (like an AppRole) needs to delegate access or issue temporary tokens with limited scopes or TTLs.
# Allows reading Azure service principal credentials
path "azure-creds/data/terraform/azure_sp" {
  capabilities = ["read"]
}

# Allows reading secrets for Linux VMs
path "secret/data/linux-vm/*" {
  capabilities = ["read"]
}

# Allows reading secrets for Windows VMs
path "secret/data/windows-vm/*" {
  capabilities = ["read"]
}

# Allows creating child tokens (as per your original policy)
path "auth/token/create" {
  capabilities = ["create", "update"]
}
# Optional: Allow token lookup and renewal for better token management
path "auth/token/lookup-self" {
  capabilities = ["read"]
}

path "auth/token/renew-self" {
  capabilities = ["update"]
}
# write this policy to Vault:
vault policy write terraform-azure-policy terraform-azure-policy.hclCreating App role and assigning terraform-azure-policy
vault write auth/approle/role/terraform-azure-deployer \
    token_ttl=1h \
    token_max_ttl=24h \
    bind_secret_id=true \
    secret_id_num_uses=1 \
    secret_id_ttl=10m \
policies="terraform-azure-policy"token_ttl=1h: The Vault token issued by this AppRole will be valid for 1 hour.
token_max_ttl=24h: The token can be renewed up to 24 hours.
bind_secret_id=true: This ensures a secret_id must be provided during login. Highly recommended for security.
secret_id_num_uses=1: This means a secret_id can only be used once to authenticate. After one successful login, it becomes invalid. This is for maximum security in automated systems where new Secret IDs are generated on the fly. For manual testing or simpler automation, you might omit this or set it higher.
secret_id_ttl=10m: The secret_id itself is valid for 10 minutes. This means you have 10 minutes to use a newly generated secret_id before it expires.
policies="terraform-azure-policy": Attaches the policy we created
Creating role named “approle-secret-id-generator”
Filename:approle-secret-id-generator-policy.hcl
Grants the
updatecapability on the path used to generate new Secret IDs for the AppRoleterraform-azure-deployer.This is required for a user or service to request a new Secret ID, which is one of the two credentials (along with the Role ID) needed to authenticate via AppRole.
Grants
readaccess to retrieve the Role ID of theterraform-azure-deployerAppRole.Role IDs are static identifiers for AppRoles, usually fetched once and reused.
approle-secret-id-generator-policy.hcl
# This policy grants permission to generate Secret IDs for the 'terraform-azure-deployer' AppRole.
path "auth/approle/role/terraform-azure-deployer/secret-id" {
  capabilities = ["update"] # 'update' allows creating/generating new Secret IDs
}

# If you also need to read the Role ID (e.g., for verification)
path "auth/approle/role/terraform-azure-deployer/role-id" {
  capabilities = ["read"]
}

# If your user needs to list existing roles (less common for this specific task)
# path "auth/approle/role" {
#   capabilities = ["list"]
# }
Apply policy:
vault policy write approle-secret-id-generator approle-secret-id-generator-policy.hclCreating a New Vault User
Now, let's create a new user who will be assigned this specific policy. We'll use the userpass authentication method for simplicity.
# Enable the userpass authentication method (if it's not already enabled)
vault auth enable userpass
# Create the user and assign the policy "approle-secret-id-generator"
vault write auth/userpass/users/vault-approle-admin password="1234" policies="approle-secret-id-generator"
# test login
vault login -method=userpass username=vault-approle-admin
# Get the role ID:
vault read auth/approle/role/terraform-azure-deployer/role-id
Key        Value
---        -----
role_id    cf3c71cd-e27a-2b56-a45b-f9c5026b0fc1
# Generate the secret
vault write -f auth/approle/role/terraform-azure-deployer/secret-id
Key                   Value
---                   -----
secret_id             95a6b3a8-d519-51a8-d97a-a7e8f4beec60
secret_id_accessor    ee924b0f-f1ce-0005-3073-e77a3c3dde84
secret_id_num_uses    1
secret_id_ttl         10m
This Bash script automates the process of authenticating to HashiCorp Vault using the AppRole authentication method.
The script performs the following steps:
Authenticate to Vault: Logs in using the
userpassmethod with the usernamevault-approle-admin.Set Configuration Variables: Defines essential variables such as:
VAULT_ADDR: The address of the Vault server.APPROLE_ROLE_NAME: The name of the AppRole (e.g.,terraform-azure-deployer).APPROLE_ROLE_ID_VAL: The Role ID associated with the AppRole.Medium+2HashiCorp Developer+2Google Grupa+2
Pre-checks and Setup: Ensures that
VAULT_ADDRis set and exports it for subsequent Vault CLI commands.Generate a New Secret ID: Creates a new Secret ID for the specified AppRole. This requires the current Vault token to have the
updatecapability on the pathauth/approle/role/<role_name>/secret-id.Authenticate Using AppRole: Uses the Role ID and the newly generated Secret ID to authenticate and obtain a new Vault client token.
Export the New Token: Sets the
VAULT_TOKENenvironment variable with the newly obtained token, allowing subsequent Vault or Terraform commands to use it.
#!/bin/bash
# --- Configuration (Adjust these values) ---
# Your Vault server address
VAULT_ADDR="https://vault.example.com" # Use the exact address you've configured

# The NAME you gave your AppRole when creating it (e.g., 'terraform-azure-deployer')
APPROLE_ROLE_NAME="terraform-azure-deployer"

# The ACTUAL Role ID you retrieved using 'vault read auth/approle/role/terraform-azure-deployer/role-id'
# This is the UUID, NOT the name.
APPROLE_ROLE_ID_VAL="cf3c71cd-e27a-2b56-a45b-f9c5026b0fc1"

# --- Pre-checks and Setup ---

# Check if VAULT_ADDR is set in the script
if [ -z "$VAULT_ADDR" ]; then
    echo "Error: VAULT_ADDR is not set in the script. Please configure it." >&2
    exit 1
fi
export VAULT_ADDR # Make sure it's exported so subsequent 'vault' commands know where to connect

echo "Attempting to generate and authenticate with AppRole '$APPROLE_ROLE_NAME' (Role ID: $APPROLE_ROLE_ID_VAL)..."

# --- Step 1: Generate a new Secret ID ---
# This command requires your *current* Vault token to have 'update' capability
# on the path auth/approle/role/<role_name>/secret-id.
# Ensure you are logged into Vault with such a token BEFORE running this script (e.g., `vault login <your_root_token>`)
echo "1. Generating new AppRole Secret ID..."
VAULT_SECRET_ID=$(vault write -f -field=secret_id "auth/approle/role/$APPROLE_ROLE_NAME/secret-id" 2>&1)

# Check if the secret ID generation was successful
if [ $? -ne 0 ]; then
    echo "Error generating Secret ID:" >&2
    echo "$VAULT_SECRET_ID" >&2 # Print the error output
    echo "Please ensure you are authenticated to Vault with sufficient permissions to write to this AppRole's secret-id endpoint." >&2
    exit 1
fi

if [ -z "$VAULT_SECRET_ID" ]; then
    echo "Error: Generated Secret ID is empty. This indicates a problem even if the command returned 0." >&2
    exit 1
fi

echo "   Secret ID generated successfully."

# --- Step 2: Authenticate to Vault using AppRole (Role ID and new Secret ID) ---
# This command uses the newly generated Secret ID and the static Role ID to get a Vault client token.
echo "2. Authenticating to Vault using AppRole Login..."
VAULT_TOKEN_NEW=$(vault write -field=token "auth/approle/login" role_id="$APPROLE_ROLE_ID_VAL" secret_id="$VAULT_SECRET_ID" 2>&1)

# Check if the AppRole login was successful
if [ $? -ne 0 ]; then
    echo "Error during AppRole login:" >&2
    echo "$VAULT_TOKEN_NEW" >&2 # Print the error output
    echo "Common reasons for this error: invalid role_id/secret_id combination (e.g., secret_id consumed, expired, or incorrect values)." >&2
    echo "Since secret_id_num_uses=1, ensure you ran this script immediately after generating a fresh Secret ID." >&2
    exit 1
fi

if [ -z "$VAULT_TOKEN_NEW" ]; then
    echo "Error: Vault client token from AppRole login is empty." >&2
    exit 1
fi

echo "   Vault client token obtained successfully."
Testing it with terraform
# Installing terraform
wget -O - https://apt.releases.hashicorp.com/gpg | sudo gpg --dearmor -o /usr/share/keyrings/hashicorp-archive-keyring.gpg
echo "deb [arch=$(dpkg --print-architecture) signed-by=/usr/share/keyrings/hashicorp-archive-keyring.gpg] https://apt.releases.hashicorp.com $(grep -oP '(?<=UBUNTU_CODENAME=).*' /etc/os-release || lsb_release -cs) main" | sudo tee /etc/apt/sources.list.d/hashicorp.list
sudo apt update && sudo apt install terraform
mkdir terraform
cd terraform
touch main.tf
main.tf
# 1. Configure the Vault Provider
terraform {
  required_providers {
    vault = {
      source  = "hashicorp/vault"
      version = "~> 3.0"
    }
    azurerm = {
      source  = "hashicorp/azurerm"
      version = "~> 3.0"
    }
  }
}

data "vault_kv_secret_v2" "windows_vm_credentials" {
  mount = "secret"
  name  = "windows-vm" # The secret name is 'windows-vm'
}

data "vault_kv_secret_v2" "linux_vm_credentials" {
  mount = "secret"
  name  = "linux-vm"   # The secret name is 'linux-vm'
}


provider "vault" {
  address = "https://vault.example.com" # Your Vault server address

  # The 'VAULT_TOKEN' environment variable will be used automatically.
}

# 2. Retrieve Azure Service Principal Credentials from Vault
data "vault_kv_secret_v2" "azure_sp_creds" {
  mount = "azure-creds"
  # Corrected: Use 'name' for the secret's path/name within the mount
  # If "terraform/azure_sp" is the full path to the secret, then 'name' should be used.
  name  = "terraform/azure_sp"
}

# 3. Configure the AzureRM Provider using secrets from Vault
provider "azurerm" {
  features {}

  client_id       = data.vault_kv_secret_v2.azure_sp_creds.data.client_id
  client_secret   = data.vault_kv_secret_v2.azure_sp_creds.data.client_secret
  tenant_id       = data.vault_kv_secret_v2.azure_sp_creds.data.tenant_id
  subscription_id = data.vault_kv_secret_v2.azure_sp_creds.data.subscription_id
}

# Your Azure resources here (e.g., Resource Group, Storage Account)
resource "azurerm_resource_group" "rg" {
  name     = "my-approle-resource-group"
  location = "West Europe" # Change to your desired Azure region
  tags = {
    environment = "Terraform RG"
  }
}

output "resource_group_name" {
  value = azurerm_resource_group.rg.name
}
Generate Secret and execute Terraform code:
vault login -method=userpass username=vault-approle-admin
source /path/to/the-script.sh
terraform init && terraform apply
If Windows credentials need to be used in Terraform module/file, it can be get from Vault in this way:
resource "azurerm_windows_virtual_machine" "this" {

name                             = "Windows server
location                         = var.resource_group_location
resource_group_name              = var.resource_group_name
network_interface_ids            = [azurerm_network_interface.this.id]
size                             = var.vm_size
availability_set_id              = var.availability_set_id
depends_on                       = [var.resource_group_name]
vm_admin = data.vault_kv_secret_v2.windows_vm_credentials.data.username
vm_password = data.vault_kv_secret_v2.windows_vm_credentials.data.password

os_disk {

    name                   = format("OS_disk")
    caching                = "ReadWrite"
    storage_account_type   = "Standard_LRS"
    # uncomment this if disk encryption is needed and initiate Azure Key vault module
    #disk_encryption_set_id = var.disk_encryption_set_id
  }

source_image_reference {
    publisher = var.vm_image_publisher
    offer     = var.vm_image_offer
    sku       = var.vm_image_sku
    version   = var.vm_image_version
  }
 }